Dec 04, 2025 | 721 words | 7 min read
11.2.3. Task 3#
Learning Objectives#
Understand the components of the HSV (Hue, Saturation, Value) color space.
Implement the mathematical conversion from the RGB to the HSV color space.
Apply a pixel-by-pixel transformation to an entire image.
Task Instructions#
Save the flowcharts for this task in tp1_team_3_teamnumber.pdf You will also need to include these flowcharts in your final report.
While RGB is great for displays, it doesn’t align well with how humans perceive color. The HSV color space is more intuitive and is often more robust for computer vision tasks like object detection. Hence, we may prefer to use it for feature extraction.
Hue (H): This is the “type” of color (e.g., red, yellow, blue). It’s represented as an angle on a color wheel, ranging from 0° to 360°.
Saturation (S): This is the “intensity” or “purity” of the color. It ranges from 0 (gray, no color) to 1 (a pure, fully saturated color).
Value (V): This is the “brightness” or “lightness” of the color. It also ranges from 0 (black, no light) to 1 (full brightness).
For this task, you will write your own functions to convert an RGB image to its HSV representation. You will create two functions: a helper function to convert a single pixel and a main function to convert the entire image. First, create a function
UDF1: rgb_to_hsv#
Write a function named rgb_to_hsv that handles the mathematical conversion for a single RGB pixel.
Input arguments: R, G, B (three integer values ranging from 0-255)
Return: H, S, V (these do not have to be integers but must be scaled to the appropriate range)
To calculate the values of H, S, V:
Normalize the RGB values from the [0, 255] integer range to the [0, 1] float range.
\(R' = R/255\)
\(G' = G/255\)
\(B' = B/255\)
Find the Maximum, Minimum, and Delta (their difference).
\(C_{max} = \max(R', G', B')\)
\(C_{min} = \min(R', G', B')\)
\(\Delta = C_{max} - C_{min}\)
Calculate Hue (\(H\)) depending on which channel had the maximum value
(11.3)#\[\begin{split}H' = \begin{cases} 0, & \text{if } \Delta = 0 \\ \left(60^\circ \times \frac{G' - B'}{\Delta} \right) \pmod{360^\circ}, & \text{if } C_{max} = R' \\ \left(60^\circ \times \frac{B' - R'}{\Delta} + 120^\circ \right) \pmod{360^\circ}, & \text{if } C_{max} = G' \\ \left(60^\circ \times \frac{R' - G'}{\Delta} + 240^\circ \right) \pmod{360^\circ}, & \text{if } C_{max} = B' \end{cases}\end{split}\]The result \(H'\) will be an angle in degrees [0°, 360°)
If \(\Delta=0\), the color is grayscale (achromatic) and the Hue is undefined, so we set it to 0
Calculate Saturation (\(S\)): Saturation is the ratio of the difference (\(\Delta\)) to the maximum value (\(C_{max}\))
(11.4)#\[\begin{split}S' = \begin{cases} 0, & \text{if } C_{max} = 0 \\ \frac{\Delta}{C_{max}}, & \text{if } C_{max} \neq 0 \end{cases}\end{split}\]The result \(S'\) is a float value in the range [0, 1]
If \(C_{max}\) is 0, the color is black, and saturation is 0
Calculate Value (\(V\)): The Value is simply the maximum component and will be a float in the range [0, 1]
(11.5)#\[ V' = C_{max}\]Rescale the H, S, V values back to the [0, 255] integer range before returning them.
\(H = \left(\frac{H'}{360}\right) \times 255\)
\(S = S' \times 255\)
\(V = V' \times 255\)
Note
These conversion formulas are based upon the official cpython colorsys source code. Using built in RGB to HSV conversion functions will not yield matching outputs.
UDF2: convert_to_hsv#
Write a function named convert_to_hsv that iterates through every pixel in the image and uses rgb_to_hsv to convert it to an HSV image.
Input argument: rgb_image (A NumPy array representing a 3-channel RGB image with a data type of unsigned 8-bit integers)
Return: hsv_image (A NumPy array representing a 3-channel HSV image)
Note
Your output array must be of the same shape as the input array, i.e., (100, 100, 3). It must also be cast to a data type of unsigned 8-bit integers (np.uint8, see the docs).
Thus, the output array’s pixel values will be rounded to integers in the range [0-255].
Main method: main#
In your main method:
Ask the user for the file path of an RGB image and load the image array using the
load_imgfunction from Section 11.2.1.Use the
clean_imagefunction from Section 11.2.2 to resize and pad it to a fixed size of 100x100.Print the new size of the cleaned image without the padding.
Ask the user for the coordinates of a pixel in the image to inspect.
Print the RGB values of the pixel at the user-specified coordinates.
Use your newly created
convert_to_hsvfunction to convert the cleaned image to the HSV color space.Print the HSV values of the pixel at the user-specified coordinates.
Display the HSV image to the user.
Ensure that your outputs match the samples below. Name this program tp1_team_3_teamnumber.py.
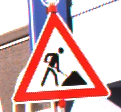
Use the files provided in the Table 11.9 to test your code.
Image File Name |
Description |
|---|---|
A raw color image to be resized |
|
A raw color image to be resized |
|
A raw color image to be resized |
Sample Output#
Use the values in Table 11.10 below to test your program.
Case |
image_path |
Coordinates (x, y) |
|---|---|---|
1 |
ref_col_raw4.png |
50, 50 |
2 |
ref_col_raw5.png |
0, 0 |
3 |
ref_col_raw5.png |
20, 20 |
4 |
ref_col_raw6.png |
12, 34 |
Ensure your program’s output matches the provided samples exactly. This includes all characters, white space, and punctuation. In the samples, user input is highlighted like this for clarity, but your program should not highlight user input in this way.
Case 1 Sample Output
$ python3 tp1_team_3_teamnumber.py Enter the path of the RGB image you want to convert to hsv: ref_col_raw4.png Resized image to: (92, 100) Enter the x and y coordinates of the pixel you want inspect: 50, 50 RGB values of the (50, 50) pixel: R=255, G=255, B=255 Converting ref_col_raw4.png to HSV... HSV values of the (50, 50) pixel: H=0, S=0, V=255
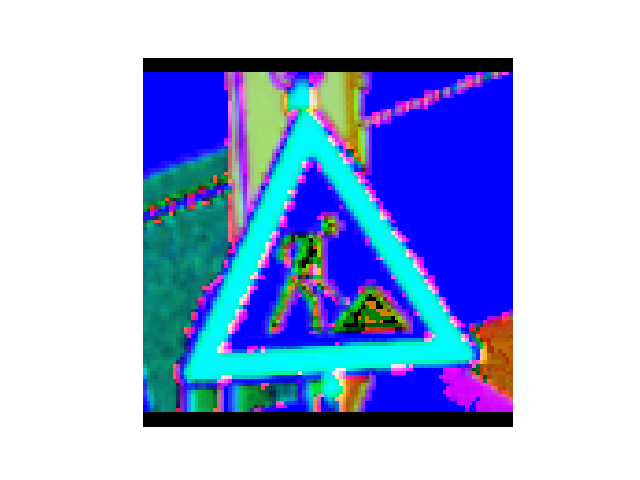
Fig. 11.8 Case_1_output_hsv_ref_col_raw4.png#
Case 2 Sample Output
$ python3 tp1_team_3_teamnumber.py Enter the path of the RGB image you want to convert to hsv: ref_col_raw5.png Resized image to: (100, 98) Enter the x and y coordinates of the pixel you want inspect: 0, 0 RGB values of the (0, 0) pixel: R=0, G=0, B=0 Converting ref_col_raw5.png to HSV... HSV values of the (0, 0) pixel: H=0, S=0, V=0
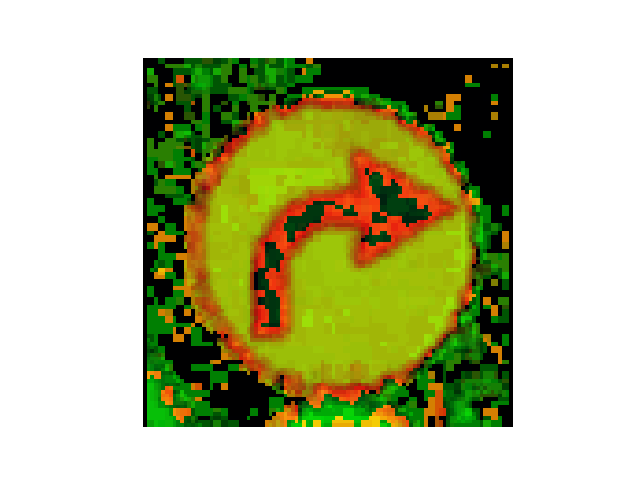
Fig. 11.9 Case_2_output_hsv_ref_col_raw5.png#
Case 3 Sample Output
$ python3 tp1_team_3_teamnumber.py Enter the path of the RGB image you want to convert to hsv: ref_col_raw5.png Resized image to: (100, 98) Enter the x and y coordinates of the pixel you want inspect: 20, 20 RGB values of the (20, 20) pixel: R=2, G=2, B=2 Converting ref_col_raw5.png to HSV... HSV values of the (20, 20) pixel: H=0, S=0, V=2

Fig. 11.10 Case_3_output_hsv_ref_col_raw5.png#
Case 4 Sample Output
$ python3 tp1_team_3_teamnumber.py Enter the path of the RGB image you want to convert to hsv: ref_col_raw6.png Resized image to: (100, 98) Enter the x and y coordinates of the pixel you want inspect: 12, 34 RGB values of the (12, 34) pixel: R=46, G=37, B=41 Converting ref_col_raw6.png to HSV... HSV values of the (12, 34) pixel: H=236, S=49, V=46
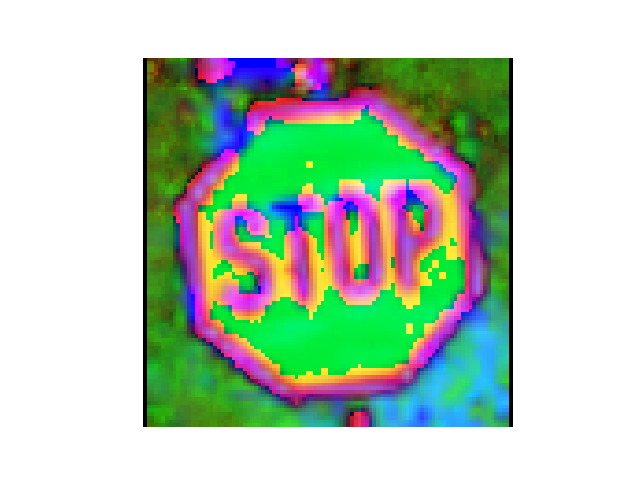
Fig. 11.11 Case_4_output_hsv_ref_col_raw6.png#
Deliverables |
Description |
|---|---|
tp1_team_3_teamnumber.pdf |
Flowchart(s) for this task. |
tp1_team_3_teamnumber.py |
Your completed Python code. |